


How to Install a Built-In Wine Fridge in Your Kitchen or Bar Area
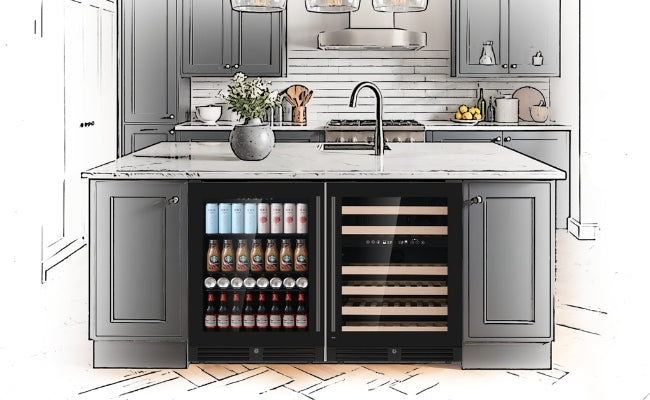
Wine enthusiasts know that proper storage is essential to maintain the quality and flavor of their favorite bottles. A built-in wine fridge is a stylish and functional addition to any kitchen or bar area, seamlessly integrating into your space while ensuring your bottles are stored at the ideal temperature.
If you’re considering installing a built-in wine fridge, this guide will walk you through everything you need to know—from choosing the right model to the step-by-step installation process. Whether you’re a DIY enthusiast or planning to hire a professional, this guide will help you make informed decisions and ensure your installation is a success.
Step 1: Understand the Benefits of a Built-In Wine Fridge
Before diving into the installation process, it's important to understand why a built-in wine fridge is a worthwhile addition to your home:
-
Space-Saving Design: Built-in wine fridges are designed to fit seamlessly into your cabinetry or countertops, saving valuable floor space.
-
Temperature Control: These appliances provide consistent temperatures to ensure your wine is stored in optimal conditions.
-
Aesthetics: Built-in designs add a sophisticated, luxurious touch to your kitchen or bar area.
-
Convenience: With your wine collection at arm’s reach, you’ll elevate your hosting experience and daily enjoyment of wine.
-
Versatile Storage: From whites to reds to sparkling wines, many units come with dual-zone temperature controls to cater to different types of wine.
Step 2: Choose the Right Built-In Wine Fridge
Not all wine fridges are created equal, and there are several factors to consider before purchasing one:
1. Size and Capacity
Measure the space where you plan to install the wine fridge. Most built-in units are between 15 and 24 inches wide, but larger models can go up to 30 inches. Consider the fridge’s capacity (how many bottles it can hold), and choose a size that suits your collection’s needs.
2. Single-Zone vs. Dual-Zone
-
Single-Zone Wine Fridges: Maintain one consistent temperature, ideal for collectors who primarily store one type of wine (e.g., just reds or whites).
-
Dual-Zone Wine Fridges: Feature two independent compartments with separate temperature controls, making them perfect for storing both reds and whites.
3. Style and Aesthetic
Look for a design that complements your kitchen or bar area. Options include stainless steel finishes, wooden racks, or glass-door designs. Pay attention to the handle style and door swing to ensure you’re happy with the overall look.
4. Ventilation Requirements
Built-in wine fridges are designed with front-facing ventilation, allowing for flush installation within cabinetry. Ensure the model you choose has the proper vent placement for your space.
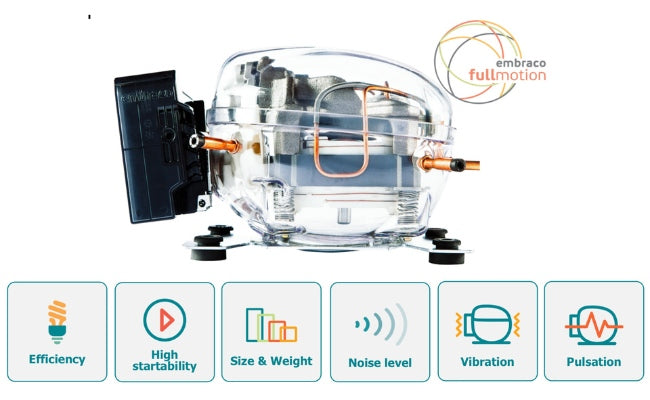
5. Noise Levels
Wine fridges with thermoelectric cooling systems are quieter than those with compressor cooling systems. If noise is a concern, opt for a low-decibel model.
Step 3: Prepare Your Space
Proper preparation is key to a seamless installation. Follow these steps to ensure your space is ready for your new wine fridge:
1. Choose the Right Location
The ideal location balances accessibility, functionality, and aesthetics. Popular placement options include:
-
Below a kitchen counter or island.
-
Integrated within your cabinetry.
-
Built into a bar or entertainment area.
Key Considerations:
-
Ensure there’s sufficient airflow around the fridge.
-
Position the fridge away from direct sunlight and heat sources like ovens or dishwashers.
-
Make sure the floor is level to prevent uneven cooling or vibration.
2. Measure the Space
Take precise measurements of the width, height, and depth of the space where the fridge will be installed. Leave enough clearance for the door to open fully without obstruction.
Tip: Allow at least 0.25 inches of clearance on each side for smooth installation.
3. Plan for Electrical Access
Built-in wine fridges require a dedicated electrical outlet. Check that your chosen location has a grounded outlet nearby (typically 120V, 60Hz). For safety, avoid using extension cords.
Step 4: Gather the Necessary Tools and Materials
To make the installation process smooth, gather the following tools and materials beforehand:
-
Measuring Tape: For double-checking dimensions and clearance.
-
Level: Ensures the fridge is installed evenly to prevent operational issues.
-
Phillips Head Screwdriver: For securing screws during installation.
-
Drill: Only if you need to modify the space for ventilation or clearance.
-
Shims: To level the fridge if the floor is uneven.
-
Protective Gloves: To handle the appliance safely.
Additionally, consult the user manual of your wine fridge for any specific tools required for installation.
Step 5: Install the Wine Fridge
With your preparations complete, it’s time to install your built-in wine fridge. Follow these steps:
1. Position the Fridge
-
Carefully slide the wine fridge into the allotted space, ensuring it aligns with adjacent cabinetry or countertops.
-
Leave clearance for the vent as required by the manufacturer (typically in the front).
Tip: Protect your flooring with a sheet or pad to avoid scratches while moving the unit.
2. Level the Fridge
Use a level to confirm the fridge is perfectly horizontal. If adjustments are needed:
-
Adjust the leveling feet on the bottom of the fridge. Most models allow you to raise or lower each corner independently.
-
Use shims if the floor is uneven.
A level fridge ensures proper cooling, even wine storage, and minimizes vibration.
3. Plug It In
Connect your wine fridge to the electrical outlet. Avoid using surge protectors or power strips, as the manufacturer’s recommendation is to plug directly into an outlet for safety and performance reasons.
4. Secure the Fridge (If Required)
Some built-in models come with brackets or mounting screws to secure the fridge to adjacent cabinetry for added stability. Follow the instructions in your user manual to complete this step if applicable.
5. Test the Door
Open and close the fridge door several times to ensure it swings freely without hitting surrounding cabinetry. Adjust the placement if necessary.
Step 6: Set the Temperature
Once the fridge is installed, set it to the proper temperature based on your wine preferences:
-
Red wines are typically stored at 55°F–65°F (13°C–18°C).
-
White wines require cooler temperatures between 45°F–50°F (7°C–10°C).
-
Sparkling wines and Champagnes are best stored around 40°F–50°F (5°C–10°C).
If you have a dual-zone fridge, designate separate compartments for reds and whites. Allow the fridge to stabilize for 24 hours before loading it with bottles.
Step 7: Load Your Wine Collection
When loading your wine fridge:
-
Place newer or unopened bottles towards the back of the fridge and older, ready-to-drink bottles up front for easy access.
-
Store bottles horizontally to keep corks moist and prevent oxidation.
-
Avoid overcrowding to maintain adequate airflow.
Maintenance Tips for Your Built-In Wine Fridge
To keep your wine fridge functioning optimally and looking great, follow these maintenance tips:
-
Clean the Unit Regularly: Wipe down the interior and exterior with a damp cloth and mild detergent. Avoid harsh chemicals.
-
Check Ventilation: Ensure the vents remain unobstructed to promote airflow and prevent overheating.
-
Inspect Door Seals: Periodically check the rubber seals on the door to ensure a tight closure.
-
Defrost if Necessary: If your fridge is not frost-free, periodically unplug and defrost it to prevent ice buildup.
-
Monitor Temperature: Use a thermometer to confirm that the internal temperature consistently matches the set range.
Proper maintenance will prolong the life of your wine fridge and protect your collection.
Common Mistakes to Avoid When Installing a Built-In Wine Fridge
To ensure a smooth installation process, avoid these common pitfalls:
-
Failing to Measure Clearance: Not leaving enough ventilation around the fridge can lead to overheating and damage.
-
Choosing the Wrong Electrical Outlet: Ensure the outlet is grounded and approved for your fridge’s voltage.
-
Ignoring Weight Distribution: Uneven floors can cause wines to settle improperly or vibrations to disrupt aging. Always use leveling feet or shims.
-
Overloading the Fridge: Overcrowding bottles can block airflow and compromise cooling efficiency.
Enhancing Your Space with a Built-In Wine Fridge
Once installed, your wine fridge will be a showpiece of your kitchen or bar area. To further elevate the space:
-
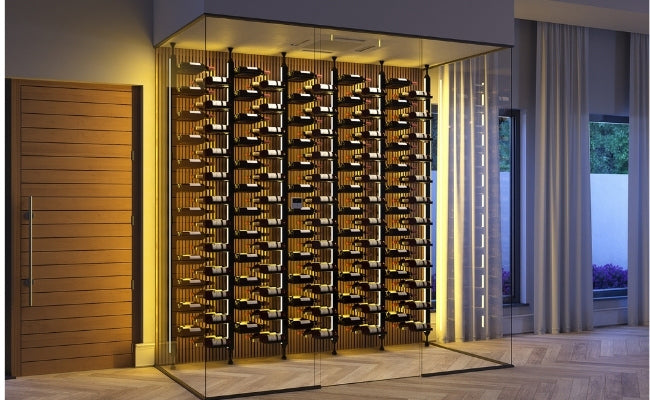
Add decorative shelving or recessed lighting around the fridge to frame it stylishly.
-
Pair the fridge with a custom wine rack for displaying prized bottle collections.
-
Use under-counter ambient lighting to illuminate the area and create a cozy ambiance in your bar or entertainment space.
Whether you’re creating the ultimate kitchen setup or a chic bar area, a built-in wine fridge combines convenience, style, and practicality, providing the perfect environment for your favorite wines to shine.
FAQ
What is a built-in wine fridge and how is it different from freestanding models?
A built-in wine fridge is designed to fit seamlessly into cabinetry, such as under counters or within kitchen units, creating a clean and integrated look. Unlike freestanding models, built-in units use front ventilation, allowing them to operate efficiently in enclosed spaces. This makes them ideal for kitchens and bar areas where space and design matter, while still ensuring proper airflow, stable cooling performance, and consistent wine storage conditions.
Where is the best place to install a built-in wine fridge?
The best place to install a built-in wine fridge depends on your layout and how you use your space. Common options include under kitchen counters, inside a kitchen island, or within a home bar area. Placing the fridge near entertaining zones makes access more convenient. It can also be integrated into cabinetry runs for a seamless look while maintaining functionality and ensuring easy access to your wine collection.
Can you install a built-in wine fridge in a home bar area?
Yes, built-in wine fridges are an excellent addition to home bar areas because they combine convenience with proper wine storage. They allow you to keep wine and beverages at ideal temperatures while maintaining a streamlined look. Many models include multiple temperature zones, making it easy to store different drinks. Their compact design helps maximize space and enhances both the functionality and aesthetic of a home bar setup.
Do built-in wine fridges require ventilation?
Yes, ventilation is essential for built-in wine fridges to operate properly and maintain consistent performance. These units are specifically designed with front-facing ventilation systems that allow heat to escape without needing extra space around the sides or back. This makes them suitable for enclosed installations. Proper ventilation helps prevent overheating, improves energy efficiency, and ensures the fridge continues to maintain stable temperatures over time.
Are built-in wine fridges suitable for kitchens?
Built-in wine fridges are highly suitable for kitchens because they integrate seamlessly into cabinetry and enhance both functionality and design. They provide convenient access to wine while maintaining ideal storage conditions. Their compact size helps save space, and their sleek appearance complements modern kitchen layouts. For homeowners who entertain often or enjoy wine regularly, they offer a practical and stylish solution for everyday use.
What features should I look for in a built-in wine fridge?
Key features to look for include precise temperature control, dual or multiple cooling zones, UV-protected glass doors, and quiet operation. Energy-efficient compressors and adjustable shelving also improve performance and usability. Additional elements like digital controls and interior lighting enhance convenience and presentation. Choosing a model with these features ensures better wine preservation, flexibility for different bottle types, and long-term reliability in both kitchen and bar environments.
Can a built-in wine fridge store beverages as well as wine?
Many built-in wine fridges can store both wine and other beverages, especially models with dual or multiple temperature zones. This allows you to keep wine at optimal serving temperatures while chilling drinks like beer or soft drinks separately. Combination storage is particularly useful in kitchens and bar areas, reducing the need for multiple appliances and making it easier to serve a variety of drinks during gatherings.
Are built-in wine fridges energy efficient?
Modern built-in wine fridges are designed to be energy efficient, often using advanced compressors and improved insulation to maintain stable temperatures with minimal power usage. These features help reduce electricity costs while ensuring reliable performance. Energy-efficient models also tend to operate more quietly and last longer, making them a practical choice for continuous use in kitchens or bar areas where both performance and efficiency are important.
How do built-in wine fridges improve home design?
Built-in wine fridges enhance home design by creating a seamless, integrated look within cabinetry or kitchen islands. They serve as both a functional appliance and a visual feature, adding a modern and sophisticated touch. Glass doors and interior lighting allow you to display your wine collection, turning it into part of the décor. This combination of style and functionality makes them a popular choice in contemporary home design.

